
Table of Contents
With modern companies using hosted email solutions, Microsoft has deprecated the use of the Send-MailMessage PowerShell cmdlet. The supported to way to send emails from a PowerShell script is with the Microsoft Graph API. Unfortunately, this is not as simple as using an on-premises SMTP server, but it's much more secure. And by building a proper PowerShell function, it's just as easy to integrate within your scripts. This does require an Office365 tenant and subscription. I will outline the steps and give an example of how to send emails with this method.
Create a Registered Sendmail App in Microsoft Entra ID
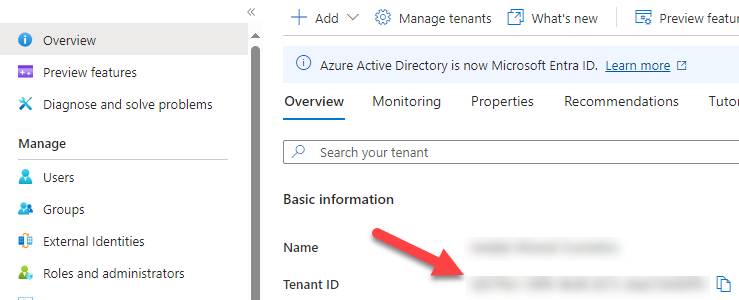
- Login to the Azure portal at https://portal.azure.com and navigate to the Microsoft Entra ID section.

Make sure to note down your Tenant ID in the overview page
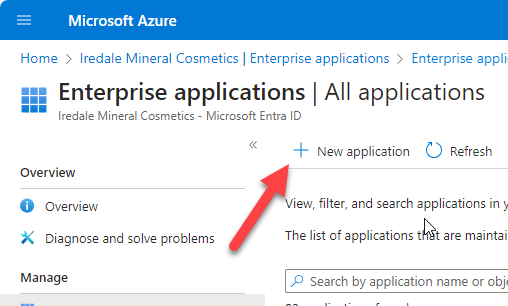
- On the left-hand side, navigate to Enterprise Applications and click Create your Own Application.
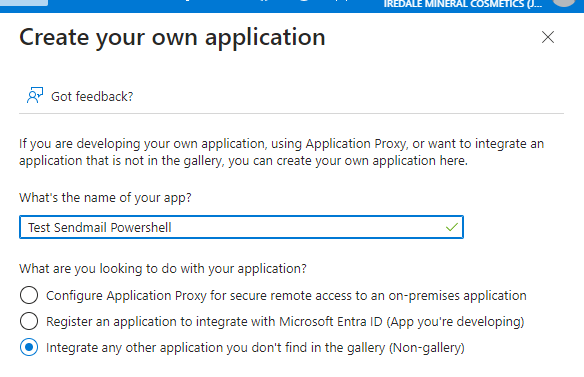
- Give your Application a Name, select non-gallery as the type, and click Create.
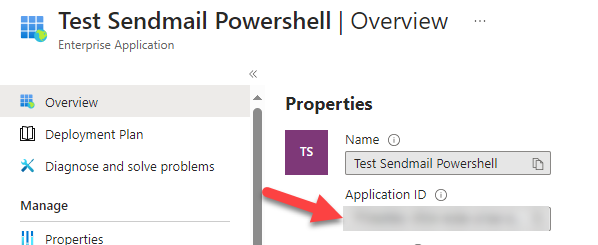
- Note the Application ID for your application
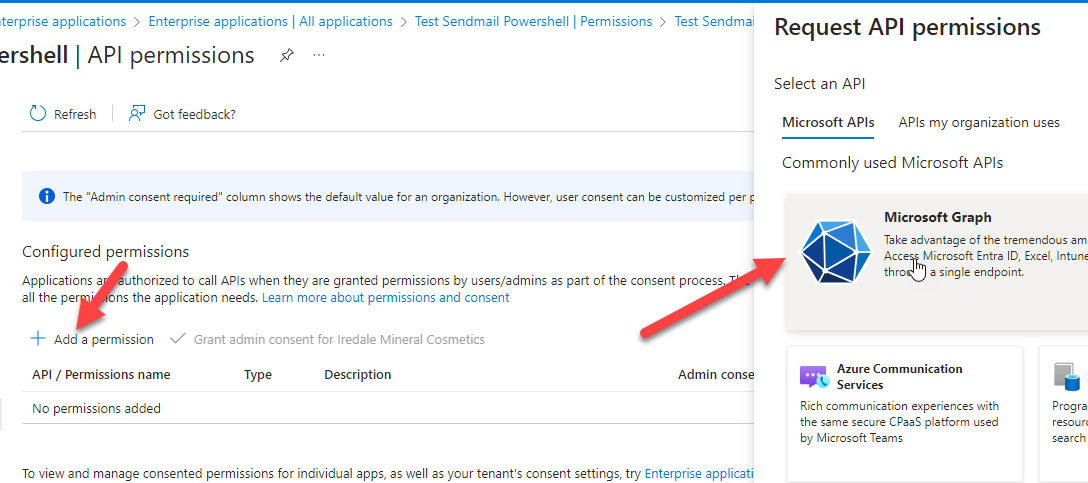
- Click the Permissions tab under Security and then click the App Registrations link to get to the API permissions page
- Click Add a permission and select Microsoft Graph
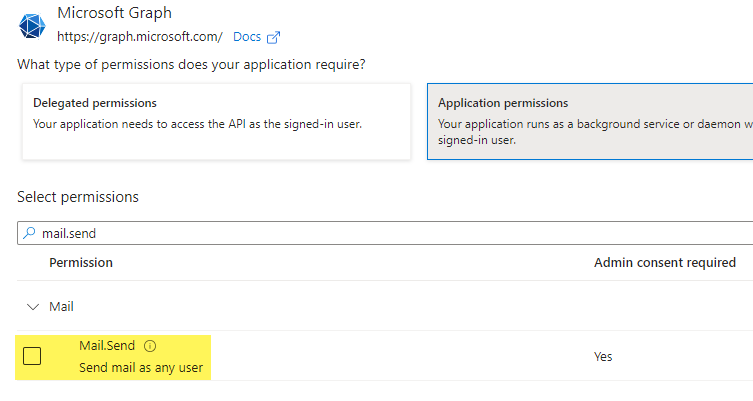
- Choose Application Permissions and type in Mail.Send and add the permission
This gives the application the ability to send as ANY mailbox in your tenant. Don't worry, we will be limiting this later to a specific group.
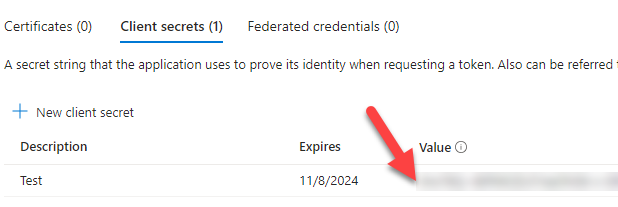
- Click Certificates and Secrets and add a new client secret. Make sure to copy the Value. The best way to store it is within a PowerShell SecretStore. Click the link for more information on how to do that.
Limit Application Permission
Now we need to limit the Mail.send permission that your application has. The best way to do this is with an Application Access Policy. An application access policy does the following...
- Defines deny or allow access
- Covers one or many Entra ID applications
- Applies to Exchange Web Services and Microsoft Graph API calls made to mailboxes for members of a mail-enabled security group or individual users
It makes the most sense to apply the policy to a mail-enabled security group and control access by adding or removing to and from that group.
- Create your mail-enabled security group. This process differs based on your environment.
- Add the desired mailboxes to the new security group you created. The sendmail application will be able to send as any mailbox in this group.
- Connect to Exchange Online PowerShell. The Exchange Online PowerShell module is required for this.
Connect-ExchangeOnline -UserPrincipalNameThis email address is being protected from spambots. You need JavaScript enabled to view it. - Now add your application access policy.
New-ApplicationAccessPolicy -AppId XXXXX-XXXX-XXXX-XXXX-XXXXXXXXXXX -PolicyScopeGroupIdThis email address is being protected from spambots. You need JavaScript enabled to view it. -AccessRight RestrictAccess -Description "Restrict access to app allowed to send email using the Graph SendMail API"This policy applies only to the AppId (Retrieved from the overview tab under enterprise applications). It allows access only to mailboxes that are members of the SendMailPowershell security group. If you attempt to send as any other mailbox, the SendMail API will return a 403 error.
- Test the Application Access Policy with the following command...
Test-ApplicationAccessPolicy -IdentityThis email address is being protected from spambots. You need JavaScript enabled to view it. -AppId XXXXX-XXXX-XXXX-XXXX-XXXXXXXXXXX
Changes to Application Access Policies can take up to 1 hour to take effect. If the test indicates the app has access to the mailbox, but you are receiving a 403 error, wait a bit longer and try again.
Create your PowerShell Function
Now it's time to create your PowerShell function. The first step is to create an authorization and retrieve an access token.
Retrieve Access Token with PowerShell
Define your function and parameters first. Then add your $TenantID, $AppId, and $AppSecret. Finally construct the URI and body and make the API call for the token.
See the following code snippet...
function sendmail{
param (
 [string]$MsgFrom,
 [array]$Recipients,
 [string]$MsgSubject,
 [string]$emailbody)

$AppId = "XXXXX-XXXX-XXXX-XXXX-XXXXXXXXXXX"
$AppSecret = Get-Secret -name sendmail-API-key -AsPlainText
$TenantId = "XXXXX-XXXX-XXXX-XXXX-XXXXXXXXXXX"
# Construct URI and body needed for authentication
$uri = "https://login.microsoftonline.com/$tenantId/oauth2/v2.0/token"
$body = @{
    client_id     = $AppId
    scope         = "https://graph.microsoft.com/.default"
    client_secret = $AppSecret
    grant_type    = "client_credentials"
}
$tokenRequest = Invoke-WebRequest -Method Post -Uri $uri -ContentType "application/x-www-form-urlencoded" -Body $body -UseBasicParsing
# Unpack Access Token
$token = ($tokenRequest.Content | ConvertFrom-Json).access_token
$Headers = @{
            'Content-Type'  = "application/json"
            'Authorization' = "Bearer $Token" }
The $AppID , $TenantID, and $AppSecret will be different in your organization. My code is using the PowerShell SecretStore to retrieve the App Secret. This code constructs the URI and body, makes a token request to the Microsoft Graph API and unpacks it. Then headers are constructed with the Bearer Token for use later.
Define Email Parameters and Call the SendMail API
Now that you have a valid authorization token, you are able to call the API to send an email. Each mailbox uses a different URI. Take a look at the rest of the functions code...
$torecipients = @()
foreach ($r in $Recipients){
    $torecipients += @{
    'emailaddress' =  @{ address = $r}}
    }

# Create message body and properties and send
      $messagebody = @{
          message = @{
            subject = $MsgSubject
            body    = @{
                content = $emailbody
                contenttype = 'html'
                    }
            toRecipients = $torecipients
            }

  savetosentitems = 'false'
} | ConvertTo-JSON -Depth 6

   # Send the message
Invoke-RestMethod -Uri https://graph.microsoft.com/v1.0/users/$MsgFrom/sendMail -Method POST -Headers $HeadersEmail -Body $messagebody
#End Function
}
This part loops through the recipients, constructs the message body, and then makes a call to the specific URI for the mailbox in the $MsgFrom parameter.
Congrats! You have created a PowerShell function for sending email!
Copy and paste this function into any PowerShell script at the top and you are able to send email in the following way...
$MailParams = @{
msgfrom = This email address is being protected from spambots. You need JavaScript enabled to view it. '
recipients = (This email address is being protected from spambots. You need JavaScript enabled to view it. ', This email address is being protected from spambots. You need JavaScript enabled to view it. ')
MsgSubject = "My Message Subject"
emailBody = $tableformat + '</body></html>'
}
sendmail @MailParamsWant to add attachments to your email? See the next section...
Add Attachments to your SendMail Function
Unfortunately, with the Microsoft Graph SendMail API, attachments are limited to 3MB. There are other methods if you need to attach larger files, but I won't be covering them with this guide. Attachments must be encoded with Base64.
Add the attachment parameter to the sendmail function. It will be a [string] and should be the file path of where the attachment is located. You will use the variable $attachmentfile in the code.
The following is the full SendMail function including the attachment parameter.
function sendmail{
param (
 [string]$MsgFrom,
 [array]$Recipients,
 [string]$MsgSubject,
 [string]$emailbody,
 [string]$attachmentfile)

$AppId = "XXXXX-XXXX-XXXX-XXXX-XXXXXXXXXXX"
$AppSecret = $sendmailapikey
$TenantId = "XXXXX-XXXX-XXXX-XXXX-XXXXXXXXXXX"
# Construct URI and body needed for authentication
$uri = "https://login.microsoftonline.com/$tenantId/oauth2/v2.0/token"
$body = @{
    client_id     = $AppId
    scope         = "https://graph.microsoft.com/.default"
    client_secret = $AppSecret
    grant_type    = "client_credentials"
}
$tokenRequest = Invoke-WebRequest -Method Post -Uri $uri -ContentType "application/x-www-form-urlencoded" -Body $body -UseBasicParsing
# Unpack Access Token
$token = ($tokenRequest.Content | ConvertFrom-Json).access_token
$HeadersEmail = @{
            'Content-Type'  = "application/json"
            'Authorization' = "Bearer $Token" }
#$ccRecipient1 = $null
#$ccRecipient2 = $null

#Define attachment

if($attachmentfile) {
    $ContentBase64 = [convert]::ToBase64String( [system.io.file]::readallbytes($AttachmentFile))
}

$torecipients = @()
foreach ($r in $Recipients){
    $torecipients += @{
    'emailaddress' =  @{ address = $r}}
    }

if($attachmentfile) {
# Create message body and properties and send
      $messagebody = @{
          message = @{
            subject = $MsgSubject
            body    = @{
                content = $emailbody
                contenttype = 'html'
                    }
            toRecipients = $torecipients
         attachments = @(
             @{
              "@odata.type" = "#microsoft.graph.fileAttachment"
              "name" = $attachmentfile
              "contentBytes" = $ContentBase64 })
           }
      savetosentitems = 'false'
    }  | ConvertTo-JSON -Depth 6
}
else {
$messagebody = @{
          message = @{
            subject = $MsgSubject
            body    = @{
                content = $emailbody
                contenttype = 'html'
                    }
            toRecipients = $torecipients
           }
      savetosentitems = 'false'
    }  | ConvertTo-JSON -Depth 6
}
# Send the message
Invoke-RestMethod -Uri https://graph.microsoft.com/v1.0/users/$MsgFrom/sendMail -Method POST -Headers $HeadersEmail -Body $messagebody
#End Function
}
After adjusting tenant and app specific variables, you can copy and paste this function into any script and use the following to send an email with an attachment!
$MailParams = @{
msgfrom = This email address is being protected from spambots. You need JavaScript enabled to view it. '
recipients = (This email address is being protected from spambots. You need JavaScript enabled to view it. ', This email address is being protected from spambots. You need JavaScript enabled to view it. ')
MsgSubject = "Subject and Attached!"
emailBody = "Take a look at the attached file."
attachmentfile = "\\fileserver\shared\report.csv"
}
sendmail @MailParamsConclusion
We went over creating a custom SendMail application in the Microsoft Entra ID portal. We assigned application permissions and generated a client secret. Then we used an application access policy to limit the scope to one mail-enabled security group. Using this application, we created a function in PowerShell to call the Microsoft Graph API and send an email message. This function can be copy and pasted into any PowerShell script and should come in very handy. Don't forget the App Secret has an expiration and you will need to generate another when it expires. Hopefully this guide was useful and happy scripting!