
Table of Contents
I noticed multiple unsuccessful connection attempts in my postfix server from various IPs. The EHLO response varies but many of them respond as "User\r\n". See the following log entries from my /var/log/postfix.log file...
Nov 10 19:20:58 mail postfix/postscreen[18652]: COMMAND PIPELINING from [162.142.125.10]:57044 after ??????: 6\2
Nov 10 19:20:57 mail postfix/postscreen[18652]: COMMAND PIPELINING from [162.142.125.10]:46298 after ??????: W\
Nov  6 05:57:36 mail postfix/postscreen[15159]: PREGREET 11 after 0.12 from [147.78.103.88]:56690: EHLO User\r\n
Oct 30 04:05:40 mail postfix/postscreen[8417]: PREGREET 11 after 0.13 from [87.120.84.90]:58426: EHLO User\r\n
Oct 30 04:54:26 mail postfix/postscreen[9258]: PREGREET 11 after 0.13 from [87.120.84.90]:51143: EHLO User\r\n
As you can see, these connection attempts are coming from many different IP addresses. The best way to handle these attempts is with a custom Fail2ban rule that can match against the EHLO response. Fail2ban is log monitoring software that is able to take action when it matches a rule. These actions can vary but the default is to "ban" the IP and/or port by creating a rule in iptables. I will walk through the setup of this custom Fail2ban rule and the subsequent testing and verifying of the rule.
Postfix
Enabling Postscreen
First, make sure you have enabled postscreen... (Skip this section if it's already enabled)
- Edit the Postfix master configuration file
$ sudo vim /etc/postfix/master.cf - Comment out the following lines by adding a #
smtp inet n - y - - smtpd - Uncomment out the following 4 lines by removing the #
smtp inet n - y - 1 postscreen smtpd pass - - y - - smtpd dnsblog unix - - y - 0 dnsblog tlsproxy unix - - y - 0 tlsproxy- The first two lines will enable Postscreen. Postscreen listens on port 25 and will check the SMTP client before its able to connect to Postfix and the smtpd daemon.
- The dnsblog service will log all DNS blacklist checks
- The tlsproxy service enables STARTTLS support for postscreen, allowing remote SMTP clients to establish encrypted connections even with postscreen enabled.
- Save and close the file
- Now edit the Postfix main config file
$ sudo vim /etc/postfix/main.cfThe goal here is to add our own IP addresses to the Postscreen whitelist so our own SMTP requests are not required to go through Postscreen. Add the following two lines to the end of the main.cf file...
postscreen_access_list = permit_mynetworks cidr:/etc/postfix/postscreen_access.cidr postscreen_blacklist_action = drop - The permit_mynetworks value will whitelist any IP listed in the mynetworks parameter. You can check the values with...
$ postconf mynetworksIf your IP address is not in this list, you can manually add it to the /etc/postfix/postscreen_access.cidr file. Open the file...
$ sudo nano /etc/postfix/postscreen_access.cidr - Add your desired IP addresses
#permit my own IP addresses.
122.53.210.110/32             permit
fde9:832c:9183:5fde:7004:435c:9154:2601/128         permit
Be sure to use CIDR notation when adding IPs to postscreen_access.cidr
-
Save and close the file. Restart postfix
$ sudo service postfix restart
HELO Access
Create a definition file for HELO requests, for now, we will only reject the User\r\n
$ vim /etc/postfix/helo_access

#Contents of the file:
User\r\n REJECT
Create the Postfix lookup table for the helo access:
$ postmap /etc/postfix/helo_accessEdit the following part, add the last line containing check_helo_access
$ vim /etc/postfix/main.cf

### Foreign mail servers must present a valid "HELO"
smtpd_helo_required = yes
smtpd_helo_restrictions =   permit_mynetworks
                            reject_invalid_helo_hostname
                            reject_non_fqdn_helo_hostname
                            reject_unknown_helo_hostname
                            check_helo_access hash:/etc/postfix/helo_access
Restart the postfix service:
$ sudo service postfix restart
Fail2ban
Install Fail2ban
- Update your sources and then install
$ sudo apt update
$ sudo apt install fail2ban

The following additional packages will be installed:
  libedit2 libexpat1 libmnl0 libnftables1 libnftnl11 libpython3-stdlib libpython3.11-minimal libpython3.11-stdlib libxtables12 media-types netbase nftables python3 python3-minimal
  python3-pyinotify python3-systemd python3.11 python3.11-minimal whois
Suggested packages:
  mailx system-log-daemon monit sqlite3 firewalld python3-doc python3-tk python3-venv python-pyinotify-doc python3.11-venv python3.11-doc binfmt-support
The following NEW packages will be installed:
  fail2ban libedit2 libexpat1 libmnl0 libnftables1 libnftnl11 libpython3-stdlib libpython3.11-minimal libpython3.11-stdlib libxtables12 media-types netbase nftables python3 python3-minimal
  python3-pyinotify python3-systemd python3.11 python3.11-minimal whois
0 upgraded, 20 newly installed, 0 to remove and 0 not upgraded.
Need to get 6602 kB of archives.
After this operation, 26.9 MB of additional disk space will be used.
Do you want to continue? [Y/n]
Type Y to accept and continue the install
- Fail2ban should complete installing. It works by reading different application logs and based on each application, performs bans. The bans are usually creating an iptables rule to drop all traffic from the offending IP to the specific port. Apps are separated by jails, and each jail can be customized how you see fit. We will be creating a jail for postscreen.
Configure Fail2ban
- Create a filter rule for postscreen
$ vim /etc/fail2ban/filter.d/postscreen.local
#Contents of the file:
[INCLUDES]
before = common.conf

[Definition]
_daemon = postfix/postscreen
failregex = ^%(__prefix_line)sPREGREET \d+ after \d+\.\d+ from \[<HOST>\]:\d+: EHLO User\\r\\n
              ^%(__prefix_line)sCOMMAND PIPELINING from \[<HOST>\]:[A-Za-z0-9]+ after.
ignoreregex =
Note the second failregex line. This will catch any spammers sending improper commands. You may add any additional filter rules here as well.
-
Create a jail.local file, that will be persistent (updates of fail2ban will leave it alone), that defines 1 retry possible before ban for the spammers and enables the rule for postscreen. Also be sure to enable the postfix and postfix-sasl (if applicable) jails.
$ vim /etc/fail2ban/jail.local

#Contents of the file:
[postscreen]
port = smtp,465,submission
logpath = %(postfix_log)s
enabled = true
maxretry = 1

[postfix]
# To use another modes set filter parameter "mode" in jail.local:
mode    = more
port    = smtp,465,submission
logpath = %(postfix_log)s
backend = %(postfix_backend)s
enabled = true

[postfix-sasl]
enabled = true
filter   = postfix[mode=auth]
port     = smtp,465,submission,imap,imaps,pop3,pop3s
# You might consider monitoring /var/log/mail.warn instead if you are
# running postfix since it would provide the same log lines at the
# "warn" level but overall at the smaller filesize.
logpath  = /var/log/mail.warn
backend = %(postfix_backend)s- Restart the fail2ban service:
$ sudo service fail2ban restartTesting
A great way to test right away is to use the fail2ban built-in testing tool. It looks like this...
$ fail2ban-regex <logfile> <failregex> <ignoreregex>
Instead of typing out the regex, you can simply point it at the config file that you created earlier. So the command looks like this...
$ fail2ban-regex /volume2/docker/projects/mail-server/mail-logs/mail.log /etc/fail2ban/filter.d/postscreen.localFail2ban will go through the log and try to match any of the regex rules inside postscreen.local. Here was the result when I ran the command...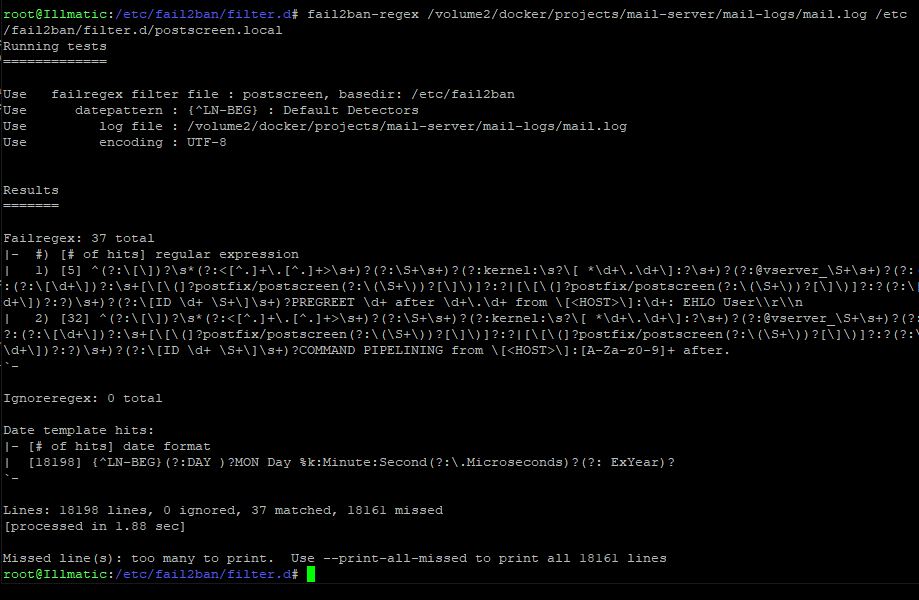
You can see the regex rules were matched 37 times in the log. 5 matches for the first rule and 32 matches for the second. Fail2ban will not actually ban those IPs right now but going forward, you will be protected.
To verify Fail2ban is working correctly with it's ban actions, you can see data accumulation (pkts and bytes values) in the iptables rule using:
$ iptables -nvL

Chain f2b-postscreen (1 references)
 pkts bytes target     prot opt in     out     source               destination
   26  1286 REJECT     0    --  *      *       139.99.187.26        0.0.0.0/0            reject-with icmp-port-unreachable
    9   456 REJECT     0    --  *      *       87.120.84.62         0.0.0.0/0            reject-with icmp-port-unreachable
    0     0 REJECT     0    --  *      *       5.42.66.20           0.0.0.0/0            reject-with icmp-port-unreachable
   96 21788 RETURN     0    --  *      *       0.0.0.0/0            0.0.0.0/0
You can also see the current banned IPs in the fail2ban client. Use the following...
$ fail2ban-client status postscreen

Status for the jail: postscreen
|- Filter
|  |- Currently failed: 0
|  |- Total failed:     0
|  `- File list:        /volume2/docker/projects/mail-server/mail-logs/mail.log
`- Actions
   |- Currently banned: 5
   |- Total banned:     5
   `- Banned IP list:   113.201.68.51 147.78.103.36 147.78.103.88 20.212.9.216 87.120.84.90
You should see a result similar to the above. If you've just enabled this jail, it could take time before the bans start to work. To monitor fail2ban live, you can tail the log file using...
$ tail -f /var/log/fail2ban.log
2023-11-11 06:40:45,327 fail2ban.actions        [18351]: NOTICE  [postscreen] Ban 5.42.66.20
2023-11-11 07:31:37,186 fail2ban.filter         [18351]: INFO    [postscreen] Found 87.120.84.62 - 2023-11-11 07:31:37
2023-11-11 07:31:37,927 fail2ban.actions        [18351]: NOTICE  [postscreen] Ban 87.120.84.62
2023-11-11 07:37:28,026 fail2ban.filter         [18351]: INFO    [postscreen] Found 139.99.187.26 - 2023-11-11 07:37:28
2023-11-11 07:37:28,186 fail2ban.actions        [18351]: NOTICE  [postscreen] Ban 139.99.187.26
This will show you a live logging of all fail2ban actions. Monitor this for a while to verify your configuration was successful. If you notice your rule is missing many of the connection attempts, add additional match rules in the postscreen.local file.
Is a specific IP address constantly showing in your logs? You can manually ban them using fail2ban.
Run the following command
$ fail2ban-client set postscreen banip 5.42.66.20The fail2ban client should respond with "1". Then you may run the following to verify the ban...
$ fail2ban-client status postscreen
Status for the jail: postscreen
|- Filter
|  |- Currently failed: 0
|  |- Total failed:     2
|  `- File list:        /var/log/mail.log
`- Actions
   |- Currently banned: 3
   |- Total banned:     3
   `- Banned IP list:   5.42.66.20 87.120.84.62 139.99.187.26
Conclusion
We enabled postscreen and configured postfix to reject specific HELO responses. We installed and added a custom jail to fail2ban using postfix/postscreen logs that will ban connections that have a specific EHLO response. I've found many of the botnets trying to connect have a USER\r\n EHLO response, so I've went with that as my block rule. An additional rule was added to catch improper commands as well. Adding new lines in postscreen.local will help you catch additional bad actors. Fail2ban is powerful and in my opinion, is mandatory for any server with ports open to the internet.
Glad it helped you!
Thanks for all the hard work!!
Hey!! No problem, I am glad you found this useful. Let me know if you run into any difficulties.
I see perhaps up to 10,000 dropped connections a day from those. I also have them on the outbound firewall as well.
Hey thanks! That is a great tip. I will check out that link and try setting it up.