Table of Contents
Cloudflare is not on the list of built in DDNS providers in Synology DSM 7. Don't fret though, you can add it manually by following this guide and using a script that is linked within. This allows your DNS record at Cloudflare to dynamically update with your IP address. For Certificates, we will use the great acme.sh (https://github.com/acmesh-official/acme.sh/wiki/Synology-NAS-Guide), script for SSL and certificate creation and renewals.
Read on for a full guide to configure DDNS and SSL on Synology DSM
Configure Synology for Cloudflare DDNS
- Synology doesn’t support Cloudflare by default, but github has a script to get this configured within DSM: https://github.com/joshuaavalon/SynologyCloudflareDDNS/
SSH into your Synology NAS and complete the following steps:
1. Download DDNS script — I recommend saving as cloudflare_domainname.sh if you have multiple domains. You will also need to add multiple listings in DSM for each DDNS domain.
$ sudo wget https://raw.githubusercontent.com/joshuaavalon/SynologyCloudflareDDNS/master/cloudflareddns.sh -O /sbin/cloudflaredns_domainname.sh2. Grant execute permissions
$ sudo chmod +x /sbin/cloudflaredns_domainname.sh3. Push configuration to DSM DDNS provider list
$ sudo echo "[Cloudflare Domain Name]">>/etc.defaults/ddns_provider.conf
$ sudo echo "  modulepath=/sbin/cloudflaredns_domainname.sh">>/etc.defaults/ddns_provider.conf
$ sudo echo "  queryurl=https://www.cloudflare.com/">>/etc.defaults/ddns_provider.conf
$ sudo echo "  website=https://www.cloudflare.com/">>/etc.defaults/ddns_provider.conf
Open Cloudflare dashboard for your domain name and complete the following steps:
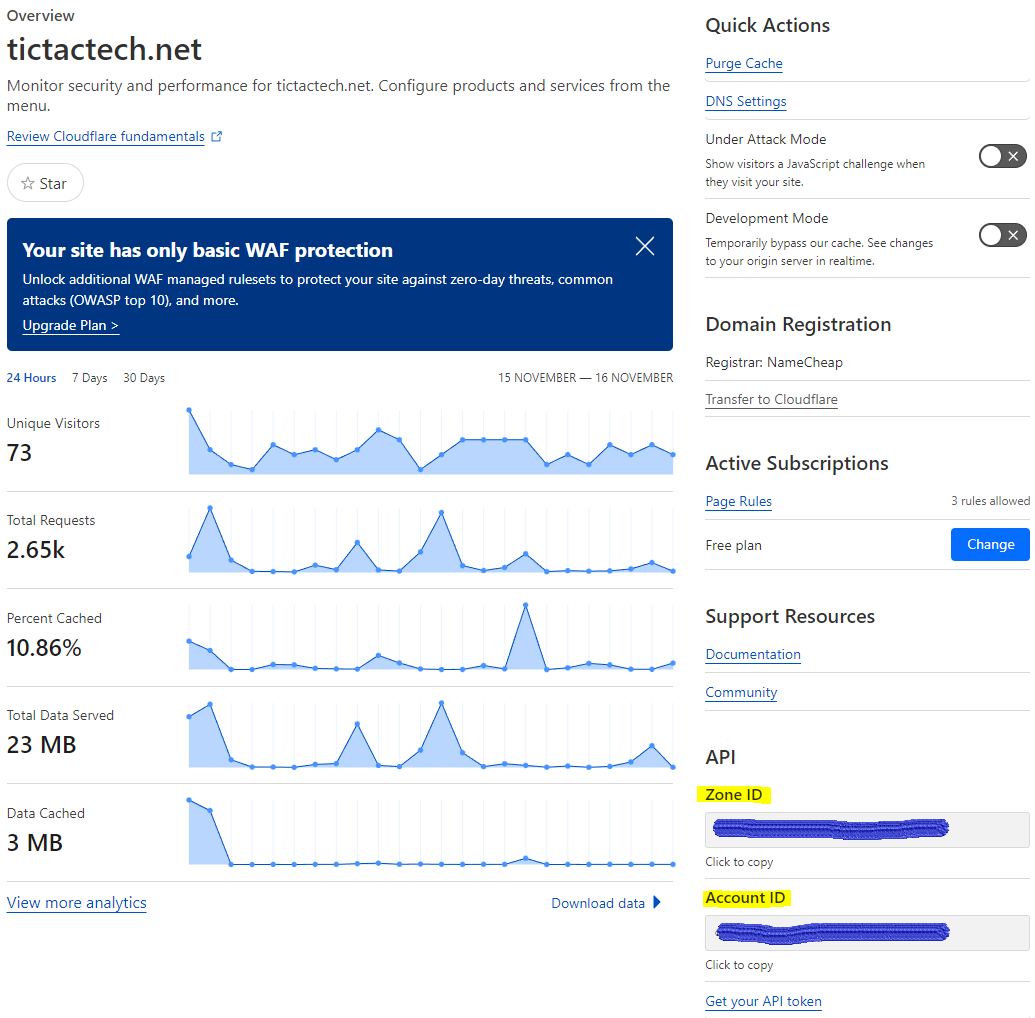
- Get Zone ID for your domain
- Generate scoped API Token with the following permissions:
- Zone — Zone — Read
- Zone — DNS — Edit
Scope the token to your required domain name, if you have multiple Zones and/or require multiple DDNS entries for different hostnames
Return to DSM Gui and complete the following steps:
- Open Control Panel -> External Access -> DDNS
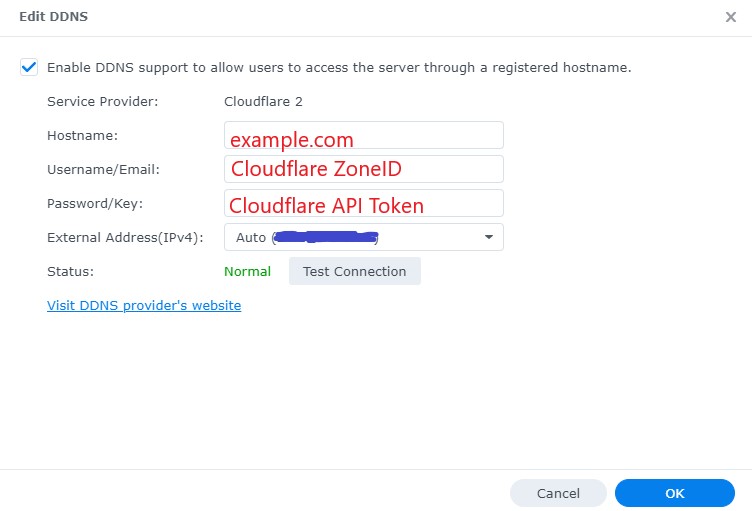
- Create “Cloudflare Domain Name”” DDNS entry in DSM Console:
- hostname: the a record of your domainname
- Username/Email: the ZoneID of your zone
- Password/Key: the scoped API token created in Cloudflare dashboard

Great! DDNS should now be working, and you can move on to create the corresponding TLS certificates for your Synology NAS
Note: If you update Synology DSM, you will likely need to perform all of these steps again, starting from the beginning "wget" command.
Configure Synology for LetsEncrypt Certificates
I suggest the following prerequisites to save time and keep this process scoped to a dedicated service user.
- Create a new certificate administrator to run acme.sh and own the cron job for refreshing certificates.
- This user must be a member of the administrators group
- Ensure you set DENY permissions on all applications other than DSM (and restrict DSM access to your NAS IP address, if possible (localhost/127.0.0.1 is unfortunately not supported)
- Ensure the user has r/w permissions to /home(s) if you have this enabled
- You will need to Disable HTTP2, if you have this configured: Control Panel -> Network -> DSM Settings -> Disable HTTP2
SSH into your Synology NAS with your new Certadmin user and complete the following steps:
-
Install reload-certs.sh (recommended)
You can use this third party script to automatically restart services when certificates are changed.
$ sudo wget -O /usr/local/bin/reload-certs.sh https://github.com/bartowl/synology-stuff/raw/master/reload-certs.sh
$ sudo chmod +x /usr/local/bin/reload-certs.sh-
Install acme.sh (with sudo -i)
From https://github.com/acmesh-official/acme.sh/wiki/Synology-NAS-Guide
$ sudo -i
$ wget https://github.com/Neilpang/acme.sh/archive/master.tar.gz
$ tar xvf master.tar.gz
$ cd acme.sh-master/
$ ./acme.sh --install --nocron --home /usr/local/share/acme.sh --accountemail "email@gmailcom"
$ sudo chown -R mycertadmin /usr/local/share/acme.sh/
$ sudo chmod 755 /usr/local/share/acme.sh
Be sure to exit your sudo session after installation and reconnect for the following steps.
-
Configure Cloudflare API settings
acme.sh supports using your global Cloudflare API key, or a scoped API token. I am using a scoped token to minimize damage in case it gets out.
Ensure you’re no longer sudo and export your environment variables below — note the difference between CF_Key and CF_Token
$ export CF_Key="MY_SECRET_KEY"
$ export CF_Email="This email address is being protected from spambots. You need JavaScript enabled to view it. "If you generated an API Token, instead of using your global account key, set CF_Token instead (preferred, and you’re using it for DDNS anyway, right?)
$ export CF_Token="MY_SECRET_TOKEN"
$ export CF_Email="This email address is being protected from spambots. You need JavaScript enabled to view it. " For either approach, you will also need your Cloudflare Account_ID. Include your Zone_ID to scope acme.sh access further within your account.
$ export CF_Account_ID="xxxxxxxxxxxxx"
$ export CF_Zone_ID="xxxxxxxxxxxxx"-
Create your certificate signing request:
$ cd /usr/local/share/acme.sh$ ./acme.sh --issue -d "example.com" -d "*.example.com" --dns dns_cf --home $PWDDone! The certificate should generate and be saved within your acme.sh directory. The terminal output should show you the exact location.
Install certificate on DSM
With the certificate now generated, we will use our Synology_Username Certificate Administrator to push the certificate into DSM via a webhook.
Create environment variables for this process (note the single quotes around the Syno_Password if you have used a complex/secure password):
$ export SYNO_Username="deploy"
$ export SYNO_Password='MyPassw0rd!'
$ export SYNO_Certificate="mydesc" # description shown in Control Panel ➡ Security ➡ Certificate
$ export SYNO_Create=1
If you already access your NAS with a secure certificate, you should set the additional variables for the hook to login correctly:
$ export SYNO_Scheme="http" # Can be set to HTTPS, defaults to HTTP
$ export SYNO_Host="localhost" # Specify if not using localhost
$ export SYNO_Port="5000" # Port of DSM WebUI (5000 for HTTP and 5001 for HTTPS)
Run the deployment command:
$ ./acme.sh -d "star.example.com" --deploy --deploy-hook synology_dsm --reloadcmd "/usr/local/bin/reload-certs.sh" --dnssleep 20 --home $PWDThe newly issued certificate will now appear in your certificate list within DSM. Take a look in Control Panel ->Security -> Certificate(s).
Press <Configure> button to change the default certificates for your desired services to your newly issued certificate. Also, right-mouse-click and select “Edit” to set the certificate as System Default.
Setup recurring task for renewal and replace
Although acme.sh can set up a cronjob automatically, you shouldn’t use it with your Synology NAS as DSM security advisor will give you a critical warning. Instead, opt to use the built-in task scheduler:
- Control Panel -> Task Scheduler
- Create -> Scheduled Task -> User-defined script
- Fill out the necessary information:
- General: Give the task a name and choose your newly created Certificate Admin user
- Schedule: e.g. weekly at 4:00 am on Saturday
- Task Settings: maybe set up an email notification and use one of the following scripts for Renewal.
# Renew single certificate
/usr/local/share/acme.sh/acme.sh --renew -d "star.example.com" --home /usr/local/share/acme.sh# Renew all certificates issued via acme.sh
/usr/local/share/acme.sh/acme.sh --cron --home /usr/local/share/acme.sh
This recurring task automatically renews your certificate and deploys it to your Synology NAS using the stored settings of the previous step.
export SYNO_Username="Certadmin"
export SYNO_Password='MyPassw0rd!'
export SYNO_Certificate="star.example.com"
export SYNO_Create=1
export SYNO_Scheme="http"
export SYNO_Host="localhost"
export SYNO_Port="5000"
cd /usr/local/share/acme.sh
/usr/local/share/acme.sh/acme.sh --renew-all --home /usr/local/share/acme.sh &&
/usr/local/share/acme.sh/acme.sh -d $SYNO_Certificate --deploy \
--deploy-hook synology_dsm \
--reloadcmd "/usr/local/bin/reload-certs.sh" \
--dnssleep 20 \
--home $PWD
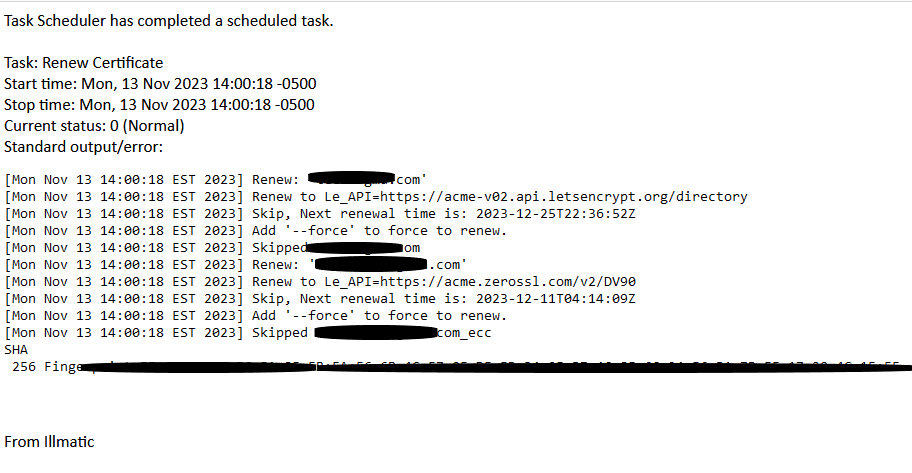
If you set notifications, you will get a recurring error from the script “Interrupted, exit 2” as your cert doesn’t need renewing for 3 months. Note in the codeblock above, the && operator only executes the deployment of the script *if* the renewal script runs successfully (with an exit0).
Check the text in your email to ensure it’s as expected:

Be aware that going forward, you may need to reinstall acme.sh to fix a broken environment after Synology DSM upgrade(s).
$ cd /usr/local/share/acme.sh
$ ./acme.sh --force --upgrade --nocron --home /usr/local/share/acme.sh
or manually add below line into /root/.profile
. "/usr/local/share/acme.sh/acme.sh.env"Conclusion
We set up Dynamic DNS with Cloudflare so that your domain A record will automatically update whenever your IP address changes. Then we requested a certificate and deployed it to Synology DSM for use in the control panel. Lastly, we created a task that runs every 3 months that will renew that certificate. Hopefully this guide was useful and feel free to email me with any feedback or questions!


Which part do you think is an error? Happy to fix it if I can confirm.